Step-by-Step: Remove Your Gel Nails at Home (With and Without Acetone)
This post contains affiliate links. I may earn a small commission if you shop through them — at no extra cost to you.
So, your gel manicure has grown out… same here! I’ve been super busy packing up and closing my studio, and let me tell you, my nails are not looking cute right now. Since I’m prepping for my upcoming press-on nail launch, I need to keep my natural nails bare and healthy.
If you’re in the same boat, growing-out gel polish, no time for a salon visit, or just trying to do your nails at home, this post is for you. The good news? Removing gel nails at home is totally doable (without wrecking your natural nails).
In this guide, I’ll walk you through two safe, step-by-step methods to remove gel polish—with acetone and without acetone so you can get back to a clean slate for your next manicure.
Already planning your next mani? Check out: How To Do Your Own Gel Nails At Home Like A Pro for a full gel application tutorial you can totally master from your kitchen table.
Let’s dive in!
What You’ll Need Before You Start
Before you begin, gather your tools. Having everything ready makes the removal process smoother and helps protect your nails.
Tools for Removing Gel Nails With Acetone:
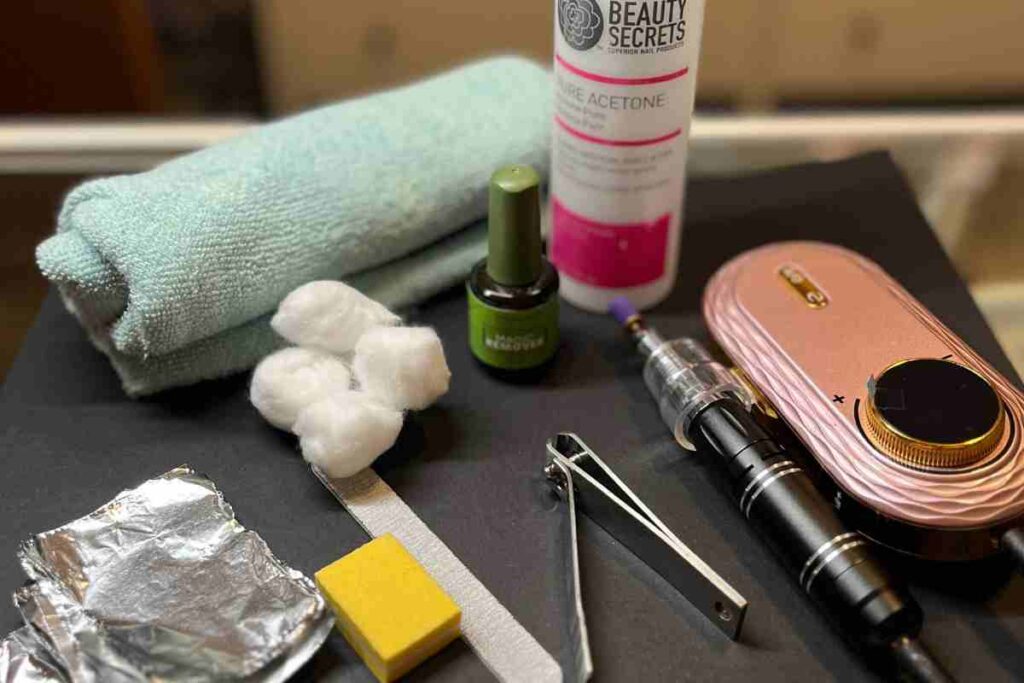
- An old hand towel or paper towel: Use this as a barrier to protect your desk or counter from spills and acetone.
- Nail file or e-file: You can use a regular file or an e-file if you’re confident—just make sure to go gently to avoid damaging your natural nail. I recommend the Makartt Nail Files 100/180 Grit (10-pack) they’re double-sided, durable, and give you both smoothing and shaping options.
- Nail buffer: Helps smooth out the nail surface after removal. I like this Buffer Block Set (10-pack), they’re gentle, long-lasting, and great for regular use. If you want a more complete kit that includes nail clippers, cuticle tools, and buffers, check out this Manicure Tools Kit from Subay, it’s a solid all-in-one option for beginners.
- 100% pure acetone: Essential for breaking down gel polish effectively. You can grab a small bottle from Sally Beauty, or try this 16oz option on Amazon, it lasts surprisingly long, especially if you’re only using it for occasional gel removals.
- Cotton pads or balls: Used to soak in acetone and apply to each nail. Honestly, any kind works, no need for anything fancy. This pack is affordable and will last you a while even if you’re doing removals regularly.
- Aluminum foil or reusable gel nail clips: Wraps or clips help secure the acetone-soaked cotton to your nails.
- Cuticle pusher and trimmer: For gently scraping off softened gel and tidying up cuticles.
- Isopropyl alcohol (rubbing alcohol 70% or alcohol prop pad): Great for wiping away any residue and sanitizing your nail surface.
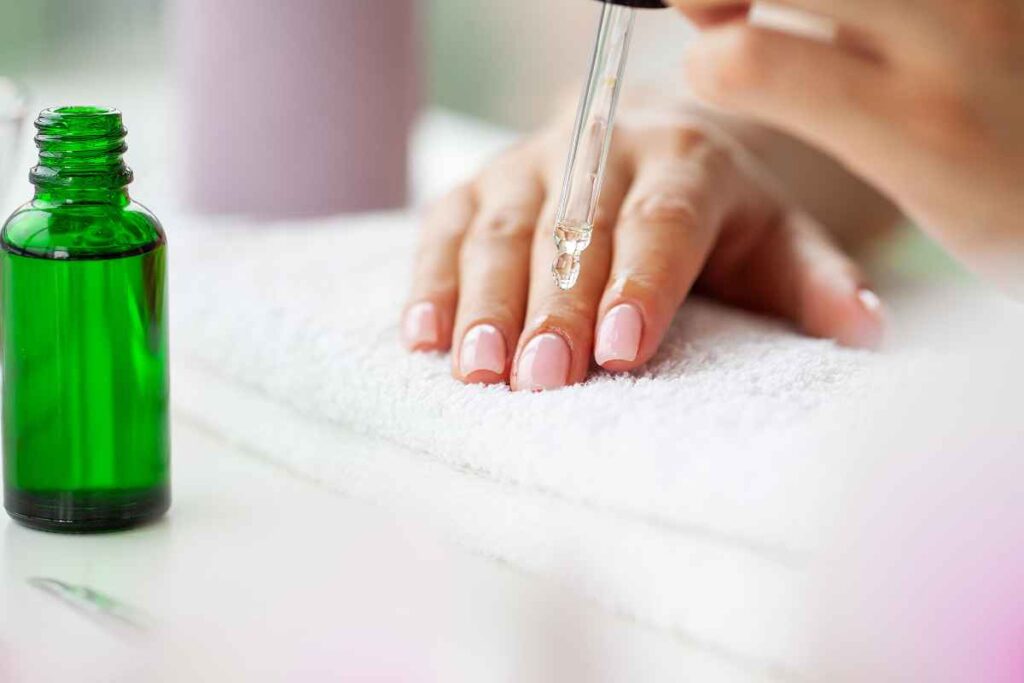
- Cuticle oil or nail strengthener: Finish off with some hydration and strength after removal!
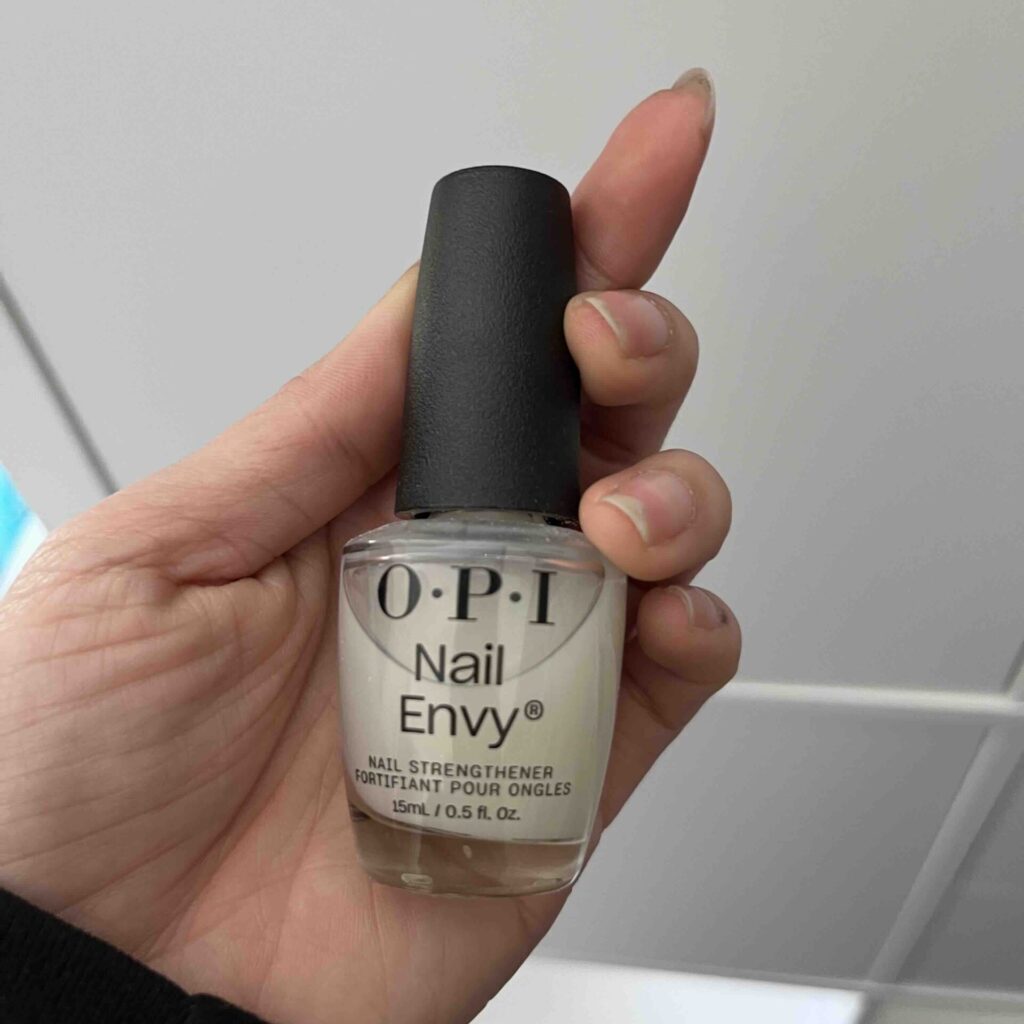
I recommend using a strengthener like OPI Nail Envy, it’s my go-to after gel removal, and it’s helped my clients grow out stronger nails.
For more tips on strengthening your nails, check out my post on How to Strengthen Weak Nails Naturally: Tips for Healthy, Strong Nails.
Method 1: How to Remove Gel Nails at Home With Acetone
If you’ve ever had your nails professionally done, this is probably the method your nail tech used. It’s quick and effective, but only if you follow the steps to avoid damage.
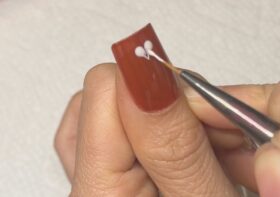
Step 1: File Off the Top Coat
Use a nail file or buffer to gently remove the shiny top layer of your gel polish. This helps the acetone soak through better. Don’t file too hard, you’re only removing the gloss, not thinning your nail.
Be sure to get into the corners of your nail, too, where gel tends to hang on.
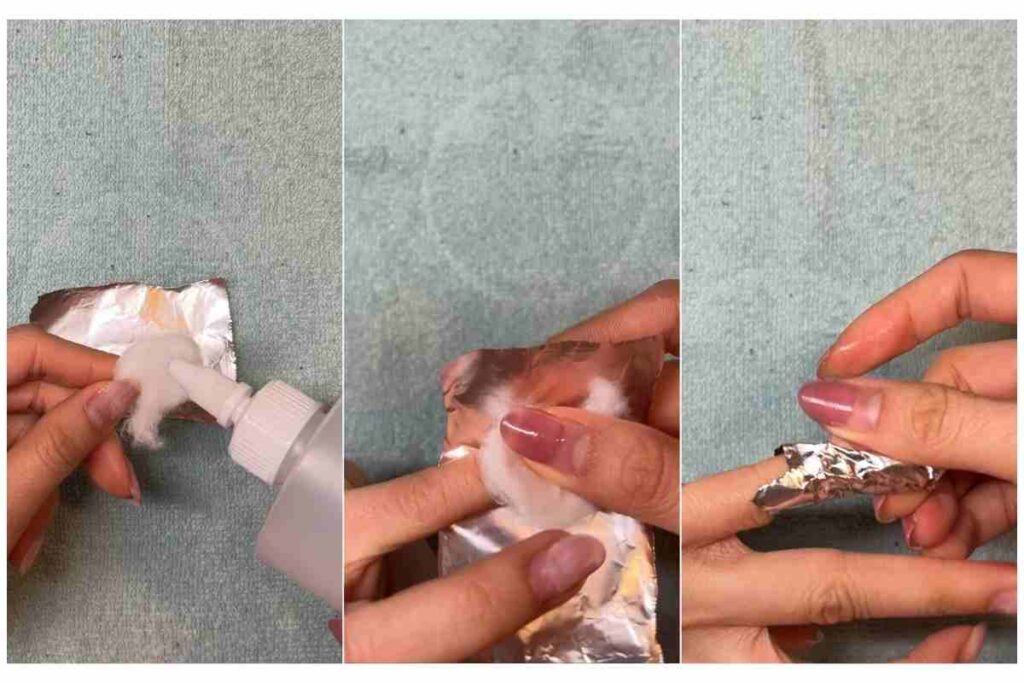
Step 2: Soak Cotton Pads in Acetone
Saturate cotton pads or balls with 100% acetone (not nail removal, it’s not strong enough) . If your skin is sensitive or you’re worried about dryness, you can apply a little cuticle oil around your nail first to protect your skin.
Step 3: Wrap Each Nail in Foil
Place the soaked cotton on your nail and wrap it in aluminum foil. Let it sit for 10–15 minutes.
Step 4: Gently Push Off the Gel
After soaking, the polish should lift easily. Use a cuticle pusher to gently scrape it off. If it’s still stuck, rewrap and soak for another 5 minutes.
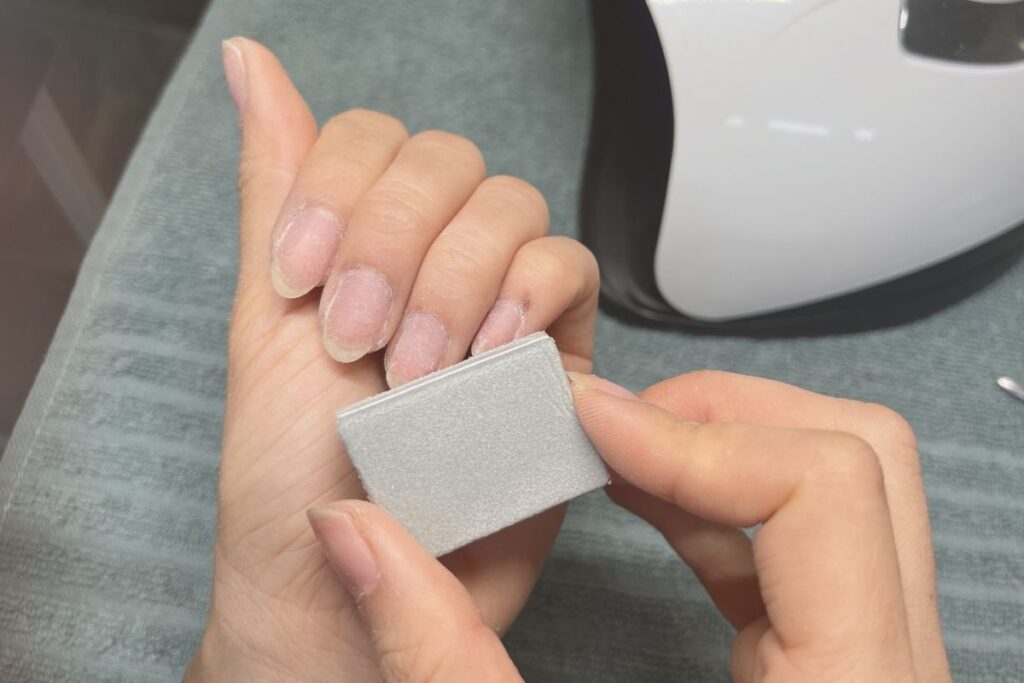
Step 5: Buff, Shape, and Clean
Buff the surface of your nails to remove any leftover gel and smooth everything out.
Then, wipe your nails with isopropyl alcohol to get rid of any residue and prep your nail surface.
Step 6: Moisturize or Reapply Gel
If you’re reapplying gel:
Skip oils and moisturizers for now as they can cause the gel to lift, wrinkle, or bubble. Want to follow along for the gel application? Check out: How To Do Your Own Gel Nails At Home Like A Pro (Step-by-Step).
If you’re taking a break:
Go in with some nourishing cuticle oil and a nail strengthener to rehydrate and protect your nails while they recover.
Method 2: How to Remove Gel Nails at Home Without Acetone
This method is perfect if you have sensitive skin or just prefer a gentler way to remove gel polish. It’s a bit slower than the acetone method but totally worth it if you’re into natural nail care, or if you’re planning to keep your nails bare between sets like I am!
What I Use (And Love)
Instead of acetone, I’ve been using a gel polish removal solution I found on Amazon, and honestly, it’s been a game changer. It’s less drying, doesn’t smell as harsh, and works really well with minimal scraping — Check it out on Amazon
Tools You’ll Need:
- All the same tools from Method 1
- Replace acetone with the gel removal solution
Step 1: File the Top Layer of Polish
Start by gently scuffing the top layer of your gel polish using a nail file or buffer.
This breaks the seal and allows the remover to do its job. Focus on dulling the shine, you’re not trying to file off the polish itself.
Don’t forget the edges and corners where gel tends to cling!
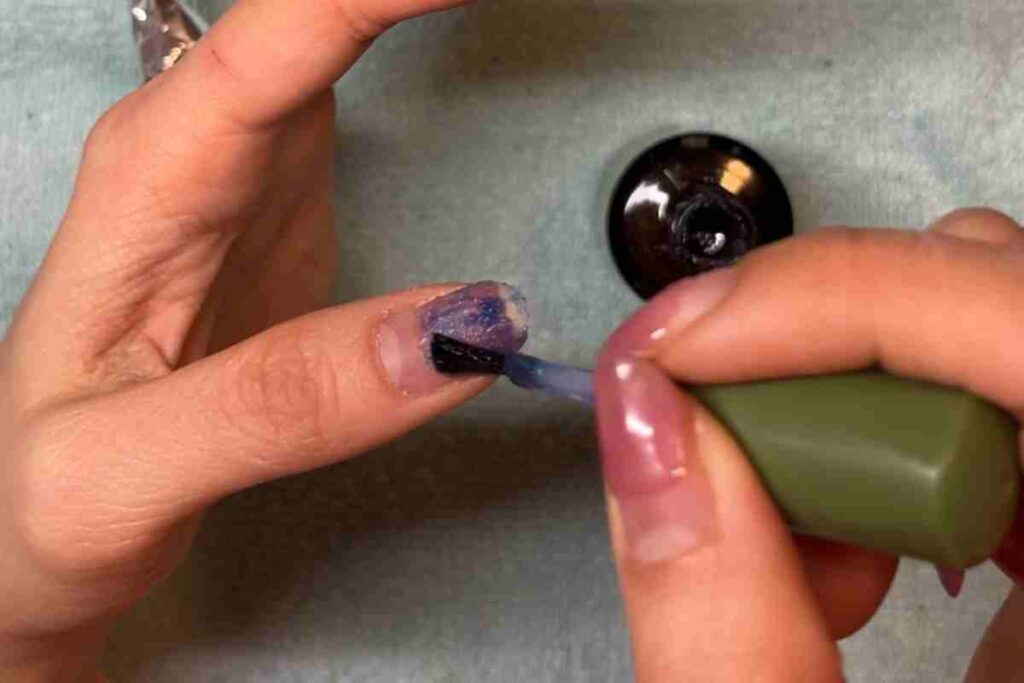
Step 2: Apply Gel Removal Solution
Coat each nail with a thin layer of the removal solution. Let it sit undisturbed for 10–20 minutes, depending on the product instructions.
You’ll start to see the gel begin to bubble or crack, this is your sign it’s working.

Step 3: Gently Push Off the Gel
Once the polish softens, use a cuticle stick to gently scrape it away. Don’t force it,if it’s not coming off easily, apply a bit more remover and wait a few more minutes.
Step 4: Smooth & Shape
Buff away any lingering residue and refine the shape of your nails with a file.
Then, cleanse your nails using rubbing alcohol or wash your hands with gentle soap and water.
Step 5: Finish with Care (or Prep for New Gel)
If you’re doing another gel set:
Avoid applying oil or lotion just yet—moisture can prevent proper gel adhesion and cause lifting or bubbling.
Follow my full gel application routine here: How To Do Your Own Gel Nails At Home
If you’re giving your nails a break:
Now’s the perfect moment to nourish your nails with:
- Rich hand cream to seal in hydration
- Cuticle oil
- A strengthening treatment
Aftercare Tips for Strong, Healthy Nails
If you’re like me and planning to keep your nails bare for a while, maybe for press-ons or just to give them a breather you might notice they start to feel brittle, dry, or a little weak. That’s totally normal after removing gel polish, but with a bit of care, you can help them bounce back fast.
Want a full guide on how to repair and strengthen your nails naturally? Check out this post.
In the meantime, here are a few quick tips to protect your nails and encourage healthy growth:
- Apply a nail strengthener
Look for treatments with keratin, biotin, or calcium to help reinforce thin or peeling nails. - Use cuticle oil daily
Massage it into your nails and surrounding skin to keep them hydrated and prevent cracking or breakage. - Avoid prolonged soaking and harsh chemicals
Water and cleaning products can weaken your nails—so throw on a pair of gloves when doing dishes or cleaning!
Give your nails a little love, and they’ll be strong and ready for your next manicure (or press-on set) in no time.
Why Proper Gel Nail Removal Matters
Gel polish is designed to stick, and it does a great job at that! But if you peel or pick it off (no judgment, we’ve all been tempted), you risk stripping away layers of your natural nail. That’s when things start getting thin, brittle, and just plain sad.
Here’s why removing gel the right way matters:
- Prevents damage like splitting, peeling, and those annoying white spots
- Maintains nail strength so your next manicure lasts longer
- Keeps your cuticles healthy by avoiding harsh scraping or forceful removal
Whether you go the acetone route or prefer a gentler, no-acetone method, patience and proper technique are everything. Your nails will thank you later!
Dealing with thin or sensitive nails after removal? I have a full post on the cause and how to repair them.
Common Questions About Removing Gel Nails
Can I just peel off my gel polish?
Nope! That can seriously damage the top layers of your natural nail.
(Trust me, I’ve been there… don’t ask me how I know 😅).
I know it’s hard to resist especially when your nails are chipped and catching on your hair, but please take the time to soak or buff them off gently. Your future nails will thank you.
What’s the fastest method?
Acetone + foil wraps are usually the quickest method, especially if you follow the steps properly.
But let me be real with you, rushing the process only leads to more damage. I’ve learned this the hard way (I’m not always the most patient with myself either!).
Can I use vodka instead of acetone?
LOL okay, this one gave me a good laugh. I haven’t personally tested it, but I’m pretty sure vodka doesn’t have the chemical strength to dissolve gel polish.
So no, I don’t think it’s going to work. BUT if you’re feeling experimental, go for it, and please let me know how it goes because now I’m curious too 😂
Why won’t my gel polish come off?
If your gel isn’t budging, here are a few things that might help:
- File off more of the top coat to break the seal
- Make sure you’re using 100% pure acetone (not a diluted polish remover)
- Soak for a bit longer, up to 20 minutes for those stubborn layers
Whether you’re a total newbie or a seasoned DIY nail artist, knowing how to remove your gel nails at home safely is a major win. It saves time, money, and most importantly, your natural nails.
Choose the method that suits you best, and don’t forget the aftercare. With the right routine, your nails will stay strong and gorgeous, whether you’re rocking fresh nail art or going bare.
Stay tuned for more tips on how to do your own nails, easy nail care tips, and nail art inspo because great nails don’t have to come from the salon.
Tried one of these methods or have a favorite removal tip? Drop a comment below, I’d love to hear how it went for you or what your go-to gel removal routine looks like!
P.S. Want to see this removal in action? Follow me on Instagram and TikTok @thatprettynail for quick videos, nail hacks, and behind-the-scenes of my nail journey.