How to Shape Your Nails at Home for Beginners: A Step-by-Step Guide
If you’ve ever struggled with shaping your nails at home, you’re not alone! Many beginners find it tricky to get an even, salon-quality finish. The good news? With the right techniques and tools, anyone can achieve perfectly shaped nails at home. This step-by-step guide will teach you everything you need to know to shape your nails like a pro, even if you’re a complete beginner.
Pro Tip: If you struggle with brittle nails, check out this companion guide How to Strengthen Weak Nails Naturally before starting for extra durability.
Why Nail Shape Matters
The shape of your nails isn’t just about aesthetics. It also affects durability, maintenance, and overall nail health. Here’s why choosing the right shape is important:
The Style Factor
Your nail shape is like the frame for your nail art, it can:
- Enhances the appearance of your hands – The right shape can make your fingers look longer and more elegant.
- Complement your personal style – Whether you prefer a classic, modern, or edgy look, your nail shape sets the tone.
- Serve as the foundation for any manicure – A well-shaped nail makes nail polish and designs stand out beautifully.
- Easier to maintain – Certain nail shapes require less upkeep.
- Fits your lifestyle – Choosing the right shape based on daily activities helps prevent damage.
The Health Benefits
Proper shaping isn’t just about looks—it also protects your nails from damage:
- Improves nail strength – Some shapes are less prone to breakage than others.
- Reduces painful breaks and splits – Smooth edges help prevent accidental chipping.
- Prevents snagging on fabrics – Avoids rough edges that can catch on clothing.
- Makes nails less prone to peeling – A proper shape strengthens your nails and prevents unnecessary stress on weak areas.
For beginners, it’s best to start with easy-to-maintain shapes that provide durability and a natural look.
Once your nails are shaped, you’ll have the perfect base for nail art! Try these beginner-friendly looks in 12 Easy Nail Art Ideas for Beginners — they’re simple, fun, and perfect for practicing at home.
Did You Know? Well-shaped nails hold polish better. After mastering these techniques, try How To Do Your Own Gel Nails At Home Like A Pro for long-lasting color!
Essential Tools for DIY Nail Shaping
Before you start shaping, gather these beginner-friendly tools:
- Nail file (100/180 grit) – Ideal for natural nails, preventing splitting and damage.
- Nail buffer – Smooths rough edges for a polished look.
- Cuticle pusher – Keeps cuticles neat and prevents hangnails.
- Nail scissors or clippers – Helps trim nails to the desired length before shaping.
- Rubbing alcohol or nail cleanser – Removes debris and preps nails for shaping.
- Cuticle oil – for healthy nail beds after shaping.
Having the right tools makes the process much easier and ensures a professional-looking finish.
Want to make sure you’ve got all the right tools before you start? Check out my post on 8 Must-Have Nail Tools for a Perfect At-Home Manicure for beginner-friendly recommendations.
Step-by-Step Guide to Shaping Nails at Home
How to File Your Nails the Right Way
Before you file your nails, always remember to remove your old polish. This helps you clean up debris and able to see what underneath. Dry hands thoroughly.
- Trim your nails – Use scissors or clippers to cut nails slightly longer than the desired length.
- File in one direction – Avoid sawing back and forth, which can weaken nails.
- Angle your file – Hold at a slight angle for smoother edges.
- Always file dry nails
- Use light pressure
- Check symmetry – Compare each nail to ensure uniform shape.
- Buff the edges – Use a buffer to smooth out any roughness. Apply oil, and moisturize.
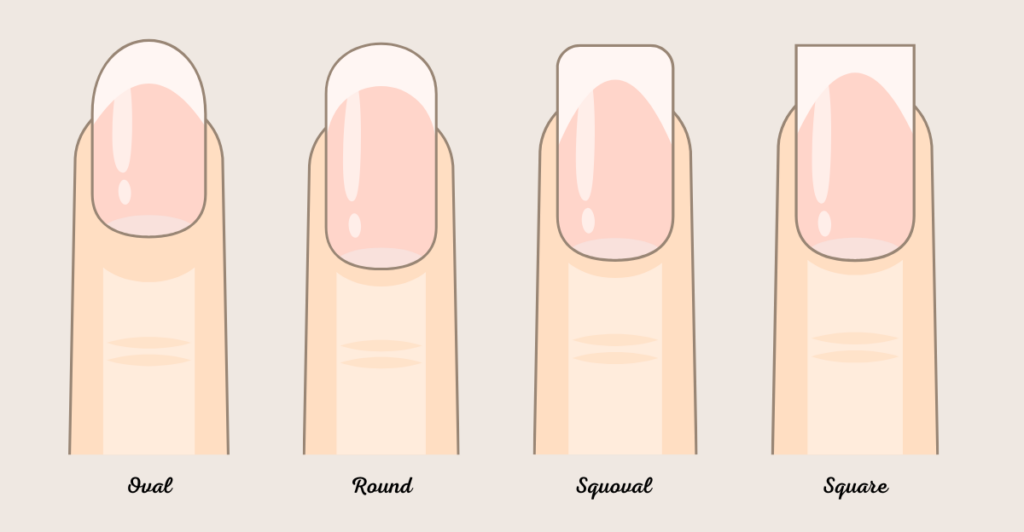
Choosing the Right Nail Shape for Beginners
As a beginner, start with shapes that are easy to maintain and suit most nail types:
1. The Timeless Oval
Perfect for: First-timers, weak nails, office environments
Why it works:
- Flatters all hand types
- Most natural-looking shape
- Easy to maintain
Filing Method:
- Start with nails trimmed to medium length
- Hold file at 45-degree angle
- File sides toward center in small strokes
- Create gentle curve following fingertip
2. The Practical Squoval (Square + Oval)
Ideal when: You want structure with softness
Benefits:
- Works with short to medium length
- Combines durability of square with elegance of oval
- Less likely to snag than pure square
Filing Method:
- File straight across tip
- Lightly round the corners
- Check symmetry from multiple angles
3. The Easy Round Shape
Best for: Short nails, frequent breakage, minimal maintenance
Why beginners love it:
- Most durable option
- Follows natural nail curve
- Requires least shaping skill
Filing Method:
- Trim nails to desired length
- Hold file parallel to nail edge
- File in small, downward sweeps following your fingertip’s natural curve
- Rotate finger to check evenness
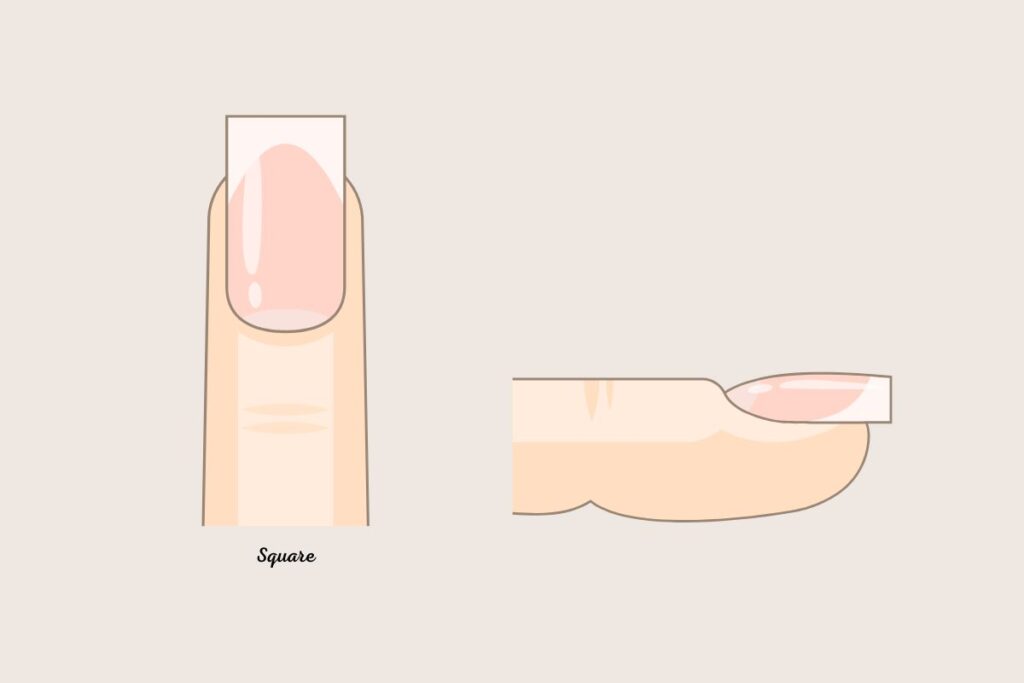
4. The Classic Square
Ideal for: Bold, modern looks | Caution: More prone to chipping
Why beginners love it:
- Perfect for French manicures
- Straight edges are easier to visualize
- Works well with short to medium lengths
But note:
✖ Sharp corners can catch on fabrics and in your hair
✖ Requires precise 90-degree angles to prevent weakness
File method:
- File straight across (use a guide like a credit card edge)
- Lightly buff corners just slightly to prevent snags
- Always finish with a protective top coat
Progression Tip: Master these basic shapes first before attempting almond or stiletto styles.
Quick Comparison
| Shape | Best For | Skill Level | Durability |
|---|---|---|---|
| Oval | Weak nails, elegance | Beginner ★☆☆ | High ★★★ |
| Squoval | Everyday wear | Easy ★★☆ | Highest ★★★ |
| Round | Short nails, active lifestyles | Easiest ★☆☆ | High ★★★ |
| Square | Modern looks | Intermediate ★★☆ | Medium ★★☆ (needs top coat) |
Beginner Recommendation: Start with oval or round, then progress to squoval/square once comfortable!
Common Mistakes Beginners Should Avoid
Many beginners make small mistakes that can lead to weak, uneven nails. Here’s what to avoid:
- Using the wrong file grit – A coarse file can damage natural nails.
- Filing back and forth – This weakens the nail and causes splitting.
- Ignoring nail prep – Always clean nails before shaping.
- Over-filing – Can make nails too thin and prone to breakage.
Avoiding these mistakes will help you achieve a professional-looking nail shape at home.
Maintaining Your Nail Shape
To keep your nails looking fresh between shaping sessions, follow these maintenance tips:
- Hydrate your nails – Use cuticle oil daily to keep nails strong.
- Protect your nails – Wear gloves when cleaning or washing dishes.
- File touch-ups – Regularly check for uneven edges and smooth them out.
- Use a strengthening base coat – Helps maintain shape and prevent breakage.
For more tips on strengthening your nails, check out my post on How to Strengthen Weak Nails Naturally: Tips for Healthy, Strong Nails.
Bonus Tips: How to Make Your Nails Look Even Better
Once you’ve shaped your nails, take them to the next level with these extra steps:
- Buffing for a smooth finish – Adds shine and removes rough edges.
- Cuticle care – Hydrated cuticles enhance the overall look.
- Polish tricks – Light or nude polish creates the illusion of longer nails.
Final Pro Tips for Nail Shaping Success:
- Lighting matters – Always shape in bright, natural light.
- Patience pays off – Rushing leads to mistakes.
- Tools make a difference – Invest in quality basics.
- Practice consistently – Your skills will improve with time.
Remember: Even celebrity manicurists started as beginners. With these techniques, you’ll be shaping like a pro in no time!
If you need to remove your old gel polish before reshaping, don’t worry, I’ve got you covered! Here’s Step-by-Step: Remove Your Gel Nails at Home (With and Without Acetone) so you can start fresh without damaging your nails.
If you’re interested in doing your own gel nails at home, check out this step-by-step guide: How To Do Your Own Gel Nails At Home Like A Pro.
Shaping your nails at home doesn’t have to be difficult! With the right tools, techniques, and a little practice, you can achieve beautiful, salon-quality nails.
Now it’s your turn, try these beginner-friendly nail shaping tips and let me know how it goes! For more nail care tips, subscribe to my blog or check out Nail Art category, where I feature the latest Instagram-inspired designs!
If you’re interested in learning more about my press-on measurement guide, check it out here.


