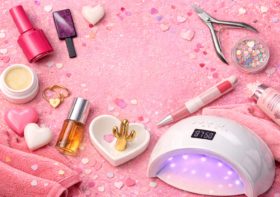
8 Must Have Nail Tools for a Perfect At Home Manicure
This post contains affiliate links. I may earn a small commission if you shop through them, at no extra cost to you.
Doing your own nails at home is honestly one of the best little luxuries. It saves money, gives you full creative control, and turns into a really relaxing form of self-care. But let’s be real, getting that clean, polished, salon-style finish at home? You need the right tools in your corner.
Whether you’re just starting out or you’ve been doing your own nails for a while, this list of essentials will seriously level up your nail game. I’ve rounded up 8 of the most helpful tools I personally recommend for DIY nails, with tips and budget-friendly picks along the way. Let’s get into it.
Why Invest in Quality Nail Tools & Products?
Before we dive into the essentials, here’s why a solid nail care toolkit is worth it:
- Cost-Effective – A one-time investment in good tools beats weekly salon visits.
- Convenience – Touch up chips or switch polish colors anytime.
- Hygiene – Avoid shared tools and germs from the salon.
- Customization – Experiment with designs and techniques at home, whenever inspiration hits.
Whether you’re into classic polish, gel, or dip nails, the right supplies make all the difference.
Why Doing Your Own Nails Is So Worth It
There’s nothing like doing your nails at home, on your time, your way. No more scheduling appointments or spending $40 every two weeks. With just a few quality tools, you can pull off everything from clean, natural nails to full-on nail art, all without leaving your house. Turn on your favorite show, light a candle, and enjoy the process, it’s personal, peaceful, and seriously relaxing.
Plus, there’s something empowering about knowing you can do it yourself. And once you’ve got the right tools? It’s way easier than it looks.
New to gel? Check out my full step-by-step guide: How To Do Your Own Gel Nails At Home Like A Pro.
The 8 Must-Have Nail Tools for DIY Nails
These tools aren’t just nice to haves, they’re your DIY manicure essentials.
1. High-Quality Nail Clippers
- Why You Need It: A clean trim is step one. Dull clippers can cause cracks or uneven edges.
- Top Pick: Tweezerman Stainless Steel Clippers – sharp, comfortable, and built to last.
- Tip: Clip straight across and refine the shape with a nail file.
2. Cuticle Pusher
- Why You Need It: Clean cuticles help your polish apply smoother and last longer.
- Top Pick: Makartt Cuticle Trimmer with Cuticle Pusher – 3 pieces set sturdy, well made & sharp.
- Tip: Soak your fingers in warm water first to gently push cuticles back.
3. Nail File (Glass or Emery Board)
- Why You Need It: Smooths and shapes your nails without splitting.
- Top Pick: 100/180 Makartt Nail Files for budget-friendly shaping.
- Tip: File in one direction to avoid peeling or weakening the nail.
Not sure how to shape your nails? Learn the basics here: How to Shape Your Nails at Home for Beginners.
4. Nail Buffer Block
- Why You Need It: Smooths out ridges and preps your nails for polish or a natural shine.
- Top Pick: A pack of Nail Buffer Blocks – multiple block, four sided 120 grit.
- Tip: Buff gently, overdoing it can thin your nails. Once a month is enough.
5. Base Coat & Top Coat
- Why You Need It: Base coat protects your nails; top coat seals in color and adds shine. Skipping either can cut your mani short.
- Top Pick: Gelish Dynamic Duo – Foundation Base & Top It Off Sealer Gel Set – smooth, quick-drying, and chip-resistant.
- Tip: Let each layer dry fully to avoid bubbling.
6. UV/LED Nail Lamp (For Gel Nails)
- Why You Need It: If you’re doing gel nails, you need a lamp to cure the polish properly.
- Top Pick: UV LED Nail Lamp – compact, fast, and beginner-friendly.
- Tip: Make sure your polish is gel-compatible.
Thinking of trying gel nails? Here’s your full how-to: How To Do Your Own Gel Nails At Home Like A Pro.
7. Gel Nail Remover & Lint-Free Cotton Pads
- Why You Need It: Mistakes happen, and old polish needs a clean removal.
- Top Pick: No soaking Gel Remover or pure acetone for a gentler option.
- Tip: Use lint-free cotton pads to avoid fuzz sticking to your polish.
Removing gel? Follow this: Step-by-Step: Remove Your Gel Nails at Home (With and Without Acetone).
8. Nail Art Brushes, Dotting Tools (Optional but Fun)
- Why You Need It: For anyone who loves a little creativity—dots, swirls, and mini masterpieces.
- Top Pick: Nail Art Brush Set – includes multiple sizes for detail work.
- Tip: Clean brushes with remover and store flat to maintain the shape.
Where to Buy These Nail Tools
| Tool | Price Range | Best For | Where to Buy |
|---|---|---|---|
| Nail Clippers | $5–$10 | Trimming | Amazon, Target |
| Cuticle Pusher | $5–$7 | Cuticle Care | Ulta, Walmart |
| Nail File | $3–$8 | Shaping | Sephora, Amazon |
| Buffer Block | $5–$8 | Surface Smoothing | Walmart, Amazon |
| Base/Top Coat | $10–$15 | Polish Protection | Drugstores, Sally Beauty, Shoppers Drug Mart |
| UV/LED Nail Lamp | $25–$50 | Gel Nails | Amazon, Sally Beauty |
| Polish Remover | $4–$11 | Cleanup | CVS, Walmart, Sally Beauty |
| Nail Art Brushes | $8–$12 | Nail Designs | Amazon, Temu |
Choosing the Right Tools for YOU
With so many options out there, picking the right nail tools can feel overwhelming—but it doesn’t have to be. If you’re just getting started, don’t feel like you need to grab everything at once. Begin with the basics: a good clipper, a nail file, and a buffer. Once you’re comfortable and ready to add polish or dive into gel, you can layer in a base/top coat, remover, and a UV/LED lamp.
Here’s a quick way to decide what’s worth getting now:
- Budget: Start with affordable essentials, and invest in a quality lamp later if you’re interested in gel nails.
- Skill Level: Beginners can skip nail art brushes at first; if you’re more advanced or love creative looks, you might want a full kit.
- Nail Goals: Sticking to regular polish? Your core tools are enough. Want to try gel or dip? You’ll need a curing lamp.
Not sure where to start? These posts break it down step by step:
- How To Do Your Own Gel Nails At Home Like A Pro (Step-by-Step)
- How to Shape Your Nails at Home for Beginners
- Step-by-Step: Remove Your Gel Nails at Home (With and Without Acetone)
Still unsure what to buy first? Drop your questions in the comments, I’ll reply with personalized suggestions.
My Top Tips for At-Home Manicure Success
- Clean and prep your nails before you even think about polish
- Apply thin coats and let each layer dry completely
- Always seal your tips with a top coat to prevent chipping
- Use cuticle oil daily, it really does help strengthen your nails
Want to get healthier nails? Check out my guide on how to strengthen your nails naturally.
Common Mistakes to Avoid When Doing Your Own Nails
Even with the best tools, slip-ups happen. Dodge these pitfalls:
- Skipping Base Coat: Leads to stained nails, don’t risk it!
- Over-Filing: Sawing back-and-forth splits nails. File one way only.
- Ignoring Cuticles: Unpushed cuticles mess up polish application.
Avoid these, and your DIY nails will look salon-fresh every time.
Doing your own nails is fun, affordable, and surprisingly satisfying. With the right tools and a little practice, you’ll be pulling off salon-quality manis from your kitchen table in no time.
Need some nail art inspo? I round up Instagram favorites weekly, so keep an eye out for those posts.
Already using some of these tools? Share your must-haves in the comments or tag me @thatprettynail, I love seeing your setups.